From PyTorch to Production: Deploy ML Models Locally with ONNX (Zero Infrastructure Cost)

The cloud isn’t always the answer. Sometimes the best deployment strategy is no deployment at all—let the user’s hardware do the work. Train in PyTorch, export to ONNX, run anywhere: browser, desktop, mobile. Zero infrastructure cost. Zero server overhead. Maximum privacy.
I built a complete pipeline demonstrating this: train an EfficientNet-B0 model in PyTorch, export to ONNX, and run it across three platforms with GPU acceleration. The results? 97.66% accuracy everywhere, from native PyTorch (2.63ms/image) to browser WebGL (26.76ms/image).
GitHub: github.com/gsantopaolo/genmind-samples/tree/main/browser-inference
The Problem: When Cloud Deployment Becomes the Bottleneck
You’ve trained a killer CNN model. 97% accuracy. Ready for production. Now what?
Traditional approach:
- Spin up a GPU server: $500-$2,000/month
- Handle scaling, load balancing, HTTPS certificates
- Manage PyTorch dependencies (~2GB)
- Deal with cold starts, API latency, concurrent requests
- Pay for inference you’re not using
- Store user data (privacy concerns)
For many use cases, this is overkill. If your model is:
- ✅ Small enough to load in a browser (< 50MB)
- ✅ Runs fast enough on consumer hardware (< 100ms)
- ✅ Doesn’t need server-side context or database access
Then you can skip the server entirely.
The Solution: Client-Side Inference with ONNX
ONNX (Open Neural Network Exchange) is the deployment format for ML models. Think of it as the “PDF of AI”—train in PyTorch, export to ONNX, run anywhere:
- 🖥️ Desktop apps (Mac/Windows/Linux) with CoreML/DirectML/CUDA
- 📱 Mobile apps (iOS/Android) with CoreML/NNAPI
- 🌐 Web browsers (Chrome/Safari/Firefox) with WebGL/WebGPU
- ⚡ Edge devices (Raspberry Pi, Jetson) with ARM optimizations
Benefits:
- ✅ Zero server cost - inference runs on user hardware
- ✅ Maximum privacy - data never leaves the device
- ✅ Instant scaling - every user brings their own GPU
- ✅ Works offline - after initial model download
- ✅ Lower latency - no network round-trip
Trade-offs:
- ⚠️ Slower than server GPUs (but often good enough)
- ⚠️ Model size matters (users download it)
- ⚠️ Can’t update model without app/site update
- ⚠️ Limited to stateless inference
Real-World Example: Bean Disease Classification
I built a complete end-to-end pipeline to demonstrate this approach:
Model: EfficientNet-B0 (CNN with 4M parameters, ~16MB ONNX)
Task: Classify bean leaf diseases (3 classes)
Dataset: 1,295 images (1,034 train, 133 val, 128 test)
Accuracy: 97.66% across all platforms
Three Deployment Targets
| Platform | Device | Speed | Throughput | Accuracy |
|---|---|---|---|---|
| PyTorch (Training) | M2 Max GPU | 2.63 ms/image | 380 img/sec | 97.66% |
| ONNX Desktop | CoreML (GPU) | 4.77 ms/image | 210 img/sec | 97.66% |
| ONNX Browser | WebGL (GPU) | 26.76 ms/image | 37 img/sec | 97.66% |
Key insight: Even the browser version (10x slower than PyTorch) is fast enough for real-time interaction (37 FPS). And it costs $0 to serve.
The Pipeline: Step-by-Step
Step 1: Train in PyTorch (The Easy Part)
Standard PyTorch training loop with transfer learning:
1
2
3
4
5
6
7
import torch
import torch.nn as nn
from torchvision import models

model = models.efficientnet_b0(weights="IMAGENET1K_V1")
num_classes = 3
model.classifier[1] = nn.Linear(model.classifier[1].in_features, num_classes)
Two-phase training strategy:
Phase 1: Freeze backbone, train classifier only (10 epochs)
1
2
3
4
5
for param in model.features.parameters():
    param.requires_grad = False

optimizer = torch.optim.Adam(model.classifier.parameters(), lr=0.001)
# ... train for 10 epochs ...
Phase 2: Unfreeze, fine-tune entire network (20 more epochs)
1
2
3
4
5
for param in model.features.parameters():
    param.requires_grad = True

optimizer = torch.optim.Adam(model.parameters(), lr=0.0001)
# ... train for 20 more epochs ...
Result: 97.66% test accuracy after ~30 epochs (~5 minutes on M2 Max MPS).
Training code: cnn_train.py
Step 2: Export to ONNX (The Critical Part)
This is where you convert PyTorch to ONNX format. Key consideration: batch size.
1
2
3
4
5
import torch
import onnx

model = load_model("checkpoints/best_model.pt")
model.eval()
Create dummy input (this defines the input shape):
1
2
batch_size = 1
dummy_input = torch.randn(batch_size, 3, 224, 224)
Export to ONNX:
1
2
3
4
5
6
7
8
9
torch.onnx.export(
    model,
    dummy_input,
    "models_onnx/model.onnx",
    export_params=True,
    opset_version=14,
    input_names=['input'],
    output_names=['output']
)
Verify the export:
1
2
3
onnx_model = onnx.load("models_onnx/model.onnx")
onnx.checker.check_model(onnx_model)
print("✅ ONNX export successful!")
Critical detail: WebGL (browser GPU backend) does not support dynamic batch sizes. You must export with a fixed batch_size=1. DO NOT use dynamic_axes if targeting WebGL. This is a WebGL limitation, not an ONNX limitation.
Export code: to_onnx.py
Step 3: Visualize the Model with Netron
Before deploying, it’s helpful to visualize the ONNX model graph to understand its structure:
Netron is an incredible tool for visualizing neural network architectures.
- Web version: netron.app - drag and drop your ONNX file
- Desktop app:
pip install netron && netron model.onnx
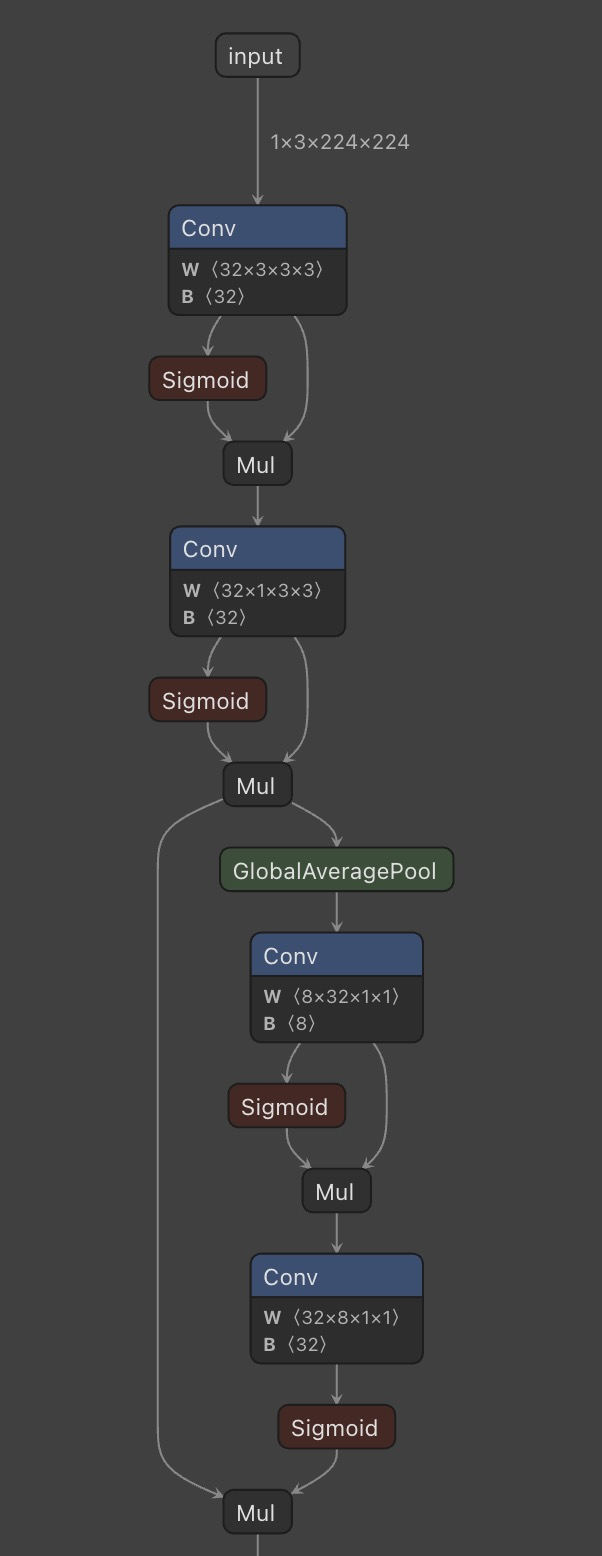 Netron shows every layer, tensor shape, and operator in your model
Netron helps you:
- ✅ Verify input/output shapes
- ✅ Understand layer structure
- ✅ Debug export issues
- ✅ Identify optimization opportunities
Step 4: Deploy to Desktop (ONNX Runtime + CoreML)
ONNX Runtime can use platform-specific accelerators:
1
2
3
4
5
6
7
import onnxruntime as ort
import numpy as np

session = ort.InferenceSession(
    "models_onnx/model.onnx",
    providers=['CoreMLExecutionProvider', 'CPUExecutionProvider']
)
Run inference:
1
2
3
image = preprocess_image("test.jpg")
outputs = session.run(None, {'input': image})
probabilities = softmax(outputs[0][0])
Get prediction:
1
2
3
4
5
class_names = ['angular_leaf_spot', 'bean_rust', 'healthy']
predicted_class = class_names[np.argmax(probabilities)]
confidence = probabilities[np.argmax(probabilities)]

print(f"Prediction: {predicted_class} ({confidence:.2%})")
Performance on M2 Max:
- Device: CoreML (GPU + Neural Engine + CPU)
- Speed: 4.77 ms/image (only 1.8x slower than native PyTorch)
- Throughput: 210 images/second
- Dependencies: Just
onnxruntime(~200MB vs PyTorch’s ~2GB)
Desktop inference code: onnx_test.py
Step 5: Deploy to Browser (ONNX Runtime Web + WebGL)
This is where it gets interesting. Run the same ONNX model in a browser with GPU acceleration:
1
2
3
import * as ort from 'onnxruntime-web';

ort.env.wasm.wasmPaths = 'https://cdn.jsdelivr.net/npm/onnxruntime-web@1.14.0/dist/';
Load model (happens once on page load):
1
2
3
4
const session = await ort.InferenceSession.create('/model.onnx', {
  executionProviders: ['webgl', 'wasm'],
  graphOptimizationLevel: 'all'
});
Run inference (on GPU via WebGL!):
1
2
3
4
5
6
7
8
9
10
const tensor = new ort.Tensor('float32', imageData, [1, 3, 224, 224]);

const startTime = performance.now();
const results = await session.run({ input: tensor });
const inferenceTime = performance.now() - startTime;

const logits = results.output.data;
const probabilities = softmax(logits);

console.log(`⏱️ Inference time: ${inferenceTime.toFixed(2)}ms`);
Performance in Chrome (M2 Max):
- Device: WebGL (GPU via browser)
- Speed: 26.76 ms/image (10x slower than PyTorch, but still fast!)
- Throughput: 37 images/second (~37 FPS)
- Bundle size: ~8MB (onnxruntime-web + WASM)
The magic: This runs entirely client-side. No server. No API calls. Just JavaScript + WebGL.
Browser app code: web-app/src/
Performance Analysis: The Real Numbers
I ran comprehensive benchmarks on a MacBook Pro M2 Max 32GB with the same 128 test images across all three platforms.
PyTorch (Native Training/Inference) ⭐
1
2
3
4
5
6
7
Device:              MPS (Metal Performance Shaders)
Backend:             PyTorch 2.x with MPS backend
Batch Size:          32 (batching enabled)
Per-Image Time:      2.63 ms
Throughput:          380 images/sec
Accuracy:            97.66%
Dependencies:        PyTorch + torchvision (~2GB)
Why it’s fastest:
- ✅ Batch processing (32 images at once) maximizes GPU utilization
- ✅ MPS backend highly optimized for Apple Silicon
- ✅ No conversion overhead—native execution
- ✅ Direct GPU memory access
When to use: Training, research, batch inference on servers/desktops.
ONNX Runtime + CoreML (Desktop Deployment) 🥈
1
2
3
4
5
6
7
Device:              CoreML (GPU + Neural Engine + CPU)
Backend:             ONNX Runtime with CoreML EP
Batch Size:          1 (single-image inference)
Per-Image Time:      4.77 ms (1.8x slower than PyTorch)
Throughput:          210 images/sec
Accuracy:            97.66%
Dependencies:        onnxruntime (~200MB)
Why it’s slightly slower:
- ⚠️ Batch size = 1 (required for WebGL compatibility)
- ⚠️ Framework interop overhead (ONNX → CoreML)
- ✅ But still very fast—only 2ms slower per image!
When to use: Production Mac/iOS apps, edge devices, when you want 10x smaller dependencies than PyTorch.
ONNX Runtime Web + WebGL (Browser Deployment) 🌐
1
2
3
4
5
6
7
Device:              WebGL (GPU via browser)
Backend:             ONNX Runtime Web with WebGL backend
Batch Size:          1 (WebGL limitation)
Per-Image Time:      26.76 ms (10x slower than PyTorch)
Throughput:          37 images/sec
Accuracy:            97.66%
Bundle Size:         ~8MB (onnxruntime-web + WASM)
Why it’s 10x slower:
- ⚠️ Browser overhead (JavaScript engine, security sandbox)
- ⚠️ WebGL API limitations (older GPU API, not ML-optimized)
- ⚠️ Data marshalling between JS/GPU/WASM contexts
- ⚠️ No batch processing
Why it’s still amazing:
- ✅ Runs entirely client-side (zero server cost)
- ✅ Privacy-first (images never leave device)
- ✅ Works offline (after initial load)
- ✅ Still fast enough (37 FPS = smooth interactive UI)
When to use: Interactive web apps, demos, privacy-sensitive applications, when you want zero infrastructure.
The Code: Key Implementation Details
Preprocessing Pipeline (Critical for Accuracy)
All three platforms must use identical preprocessing:
Python (PyTorch/ONNX):
1
2
3
4
5
6
7
8
9
10
11
12
13
from torchvision import transforms

preprocess = transforms.Compose([
    transforms.Resize((224, 224)),
    transforms.ToTensor(),
    transforms.Normalize(
        mean=[0.485, 0.456, 0.406],
        std=[0.229, 0.224, 0.225]
    )
])

image = Image.open("test.jpg").convert("RGB")
tensor = preprocess(image).unsqueeze(0)
JavaScript (Browser):
1
2
3
4
5
6
7
8
9
10
11
12
13
14
15
16
17
18
19
20
21
22
async function preprocessImage(imageFile: File): Promise<Float32Array> {
  const img = await createImageBitmap(imageFile);

  const canvas = new OffscreenCanvas(224, 224);
  const ctx = canvas.getContext('2d')!;
  ctx.drawImage(img, 0, 0, 224, 224);

  const imageData = ctx.getImageData(0, 0, 224, 224);
  const pixels = imageData.data;

  const float32Data = new Float32Array(3 * 224 * 224);
  const mean = [0.485, 0.456, 0.406];
  const std = [0.229, 0.224, 0.225];

  for (let i = 0; i < 224 * 224; i++) {
    float32Data[i] = ((pixels[i * 4] / 255) - mean[0]) / std[0];
    float32Data[i + 224 * 224] = ((pixels[i * 4 + 1] / 255) - mean[1]) / std[1];
    float32Data[i + 224 * 224 * 2] = ((pixels[i * 4 + 2] / 255) - mean[2]) / std[2];
  }

  return float32Data;
}
Critical: Identical preprocessing ensures identical predictions across platforms. Any deviation will cause accuracy loss.
WebGL Optimization: Model Loading + Warmup
Browser performance requires careful optimization:
1
2
3
4
5
6
7
8
9
10
11
12
13
14
15
16
17
18
19
20
21
22
23
24
25
26
27
28
29
useEffect(() => {
  const loadModelOnMount = async () => {
    console.log('⏳ Loading model on page load...');
    const loadStart = performance.now();

    const session = await ort.InferenceSession.create('/model.onnx', {
      executionProviders: ['webgl', 'wasm'],
      graphOptimizationLevel: 'all'
    });

    const loadTime = (performance.now() - loadStart).toFixed(2);
    console.log(`✅ Model loaded in ${loadTime}ms`);

    console.log('🔥 Warming up WebGL session...');
    const warmupStart = performance.now();
    const dummyInput = new ort.Tensor(
      'float32',
      new Float32Array(1 * 3 * 224 * 224),
      [1, 3, 224, 224]
    );
    await session.run({ input: dummyInput });
    const warmupTime = (performance.now() - warmupStart).toFixed(2);
    console.log(`✅ Warmup complete in ${warmupTime}ms`);

    sessionRef.current = session;
  };

  loadModelOnMount();
}, []);
Why warmup matters: WebGL compiles shaders on first inference. Without warmup, the first real inference would take ~300-500ms instead of ~27ms. By warming up during model load (which happens in the background), every user inference is fast.
Full web app: web-app/src/App.tsx
When This Approach Works (And When It Doesn’t)
✅ Great Fit When:
- Model is small (< 50MB compressed)
- Example: EfficientNet-B0 (16MB), MobileNetV3 (5MB), ResNet18 (45MB)
- Users can tolerate a one-time download
- Inference is fast enough on consumer hardware (< 100ms)
- Example: Image classification, object detection, OCR
- User experience isn’t degraded by client-side processing
- Privacy matters
- Example: Medical imaging, personal photo analysis, document processing
- Users don’t want to upload sensitive data to servers
- You want zero scaling costs
- Example: Demos, MVPs, open-source tools
- Every user brings their own compute
- Stateless inference
- Example: Single-image classification, translation, speech-to-text
- No need for server-side context or database lookups
❌ Poor Fit When:
- Model is huge (> 100MB)
- Example: GPT-style transformers, large diffusion models
- Download time and memory usage become prohibitive
- Inference is too slow on consumer hardware (> 500ms)
- Example: Complex generative models, video processing
- User experience suffers
- You need server-side context
- Example: Recommendation systems, personalization
- Requires access to user history, database, other models
- Model updates frequently
- Example: Continuously learning systems
- Deploying new models to clients is slow and cumbersome
- You need powerful GPUs
- Example: Real-time video generation, large-scale search
- Consumer hardware can’t compete with A100s
Cost Analysis: Cloud vs. Client-Side
Let’s compare the economics for a hypothetical app with 100,000 monthly users each making 10 inferences/month (1 million total inferences).
Cloud Deployment (GPU Server)
1
2
3
4
5
6
7
8
9
AWS g5.xlarge (1× NVIDIA A10G, 4 vCPUs, 16GB RAM)
Cost: $1.006/hour = $730/month (730 hours assuming 100% uptime)

Inference throughput: ~5,000 images/second (batch=32)
Load factor: 1M inferences / 2.6M seconds/month = ~0.4 req/sec (underutilized)

Monthly cost: $730
Cost per 1M inferences: $730
Cost per user: $0.007
Client-Side Deployment (ONNX in Browser)
1
2
3
4
5
6
7
8
9
Infrastructure: Static hosting (Vercel/Netlify/S3)
Cost: $0/month (free tier) to $20/month (CDN bandwidth)

Model file: 16MB × 100,000 users × cache hit rate 0.8 = ~320GB bandwidth
Bandwidth cost (S3): 320GB × $0.09/GB = $28.80/month

Monthly cost: ~$30
Cost per 1M inferences: ~$30
Cost per user: $0.0003
Savings: ~96% cheaper ($730 → $30), assuming static hosting and reasonable CDN caching.
At scale (1M users): Cloud would cost $7,300/month. Client-side would cost ~$300/month (mostly bandwidth).
Deployment Checklist
Before shipping your ONNX model to production:
✅ Model Export
- Export with fixed batch size if targeting WebGL
- Use opset version 14+ for broad compatibility
- Verify export with
onnx.checker.check_model() - Test ONNX outputs match PyTorch outputs (max difference < 1e-5)
✅ Preprocessing
- Identical preprocessing across all platforms (Python/JS)
- Same normalization (mean/std from training)
- Same resize method (bilinear/bicubic)
- Same color space (RGB, not BGR)
✅ Performance
- Benchmark on target hardware (not just dev machine)
- Test on low-end devices (not just M2 Max)
- Measure cold start time (model loading + first inference)
- Add warmup inference for WebGL to pre-compile shaders
✅ Browser Compatibility
- Test on Chrome, Safari, Firefox, Edge
- Handle WebGL failures gracefully (fallback to WASM or server)
- Show loading states (model loading can take 2-5 seconds)
- Monitor bundle size (onnxruntime-web adds ~5-8MB)
✅ Production Considerations
- Compress model file (gzip reduces ONNX files by ~50%)
- Use CDN for model file (cache at edge)
- Add version hash to model filename (cache busting)
- Implement telemetry (inference time, success rate, errors)
Live Demo & Full Code
I’ve built a complete, production-ready reference implementation:
🌐 Live Demo (Coming Soon)
Try the browser app here - Upload an image and see GPU-accelerated inference in your browser.
📦 Full Source Code
GitHub Repository: gsantopaolo/genmind-samples/browser-inference
What’s included:
- Training code:
cnn/cnn_train.py- Train EfficientNet-B0 on your dataset - ONNX export:
cnn/to_onnx.py- Export to ONNX with verification - Desktop inference:
cnn/onnx_test.py- ONNX Runtime with CoreML - Browser app:
web-app/- React + TypeScript + ONNX Runtime Web - Benchmarks: Complete performance analysis across all platforms
- Documentation:
PERFORMANCE_COMPARISON.md- Detailed analysis
📊 Performance Comparison Document
browser-inference/PERFORMANCE_COMPARISON.md - Deep dive into:
- Batch size impact on performance
- Why PyTorch is fastest, ONNX is deployable, WebGL is scalable
- Browser-specific performance differences
- When to use each platform
Quick Start: Run It Yourself
1. Train the Model
1
2
3
4
5
git clone https://github.com/gsantopaolo/genmind-samples.git
cd genmind-samples/browser-inference/cnn

pip install -r requirements.txt
python cnn_train.py        # ~5 mins on M2 Max, achieves 97% accuracy
2. Export to ONNX
1
python to_onnx.py          # Creates models_onnx/model.onnx (16MB)
3. Test Desktop Inference
1
2
python onnx_test.py        # Benchmark ONNX Runtime + CoreML
# Output: ⏱️ Average inference time: 4.77 ms/batch (4.77 ms/image)
4. Run Browser App
1
2
3
4
cd ../web-app
npm install
cp ../cnn/models_onnx/model.onnx public/
npm run dev                # Opens http://localhost:5173
Upload an image and see GPU-accelerated inference in your browser!
Visualizing Models with Netron
Netron is essential for understanding and debugging ONNX models.
- Web app: netron.app - Zero install, drag-and-drop interface
- CLI:
pip install netron && netron model.onnx- Opens local server athttp://localhost:8080
What Netron shows:
- Complete model graph with all layers
- Input/output tensor shapes and data types
- Operator details (Conv2D parameters, activation functions, etc.)
- Memory footprint and parameter count
- Model metadata and opset version
Pro tip: Always visualize your ONNX export in Netron before deploying. It helps catch:
- Incorrect input shapes (e.g., NCHW vs NHWC)
- Missing layers or operations
- Unexpected quantization
- Opset compatibility issues
Final Thoughts
Client-side ML deployment isn’t a replacement for cloud inference—it’s a complementary strategy. For many use cases, it’s the better strategy:
- 🌐 Web demos - No backend needed, deploy to Vercel/Netlify for free
- 📱 Mobile apps - Privacy-first, works offline, instant response
- 🖥️ Desktop tools - Lightweight deployment without PyTorch’s 2GB footprint
- 🎓 Education - Students can run models without GPU servers
The decision matrix is simple:
- Small model + fast enough + privacy matters → Deploy client-side
- Large model or needs server context → Deploy server-side
- Both! → Progressive enhancement (try client-side, fallback to server)
The ONNX ecosystem makes this trivial. Train in PyTorch (the best training framework), export to ONNX (the universal deployment format), run anywhere (browser, desktop, mobile, edge).
Zero infrastructure cost. Maximum privacy. Instant scale.
Questions? Open an issue on GitHub or find me on Twitter.
Need Help with Your AI Project?
Whether you’re building a new AI solution or scaling an existing one, I can help. Book a free consultation to discuss your project.